Week 8 - Capstone Research + Arduino Work
This week, I shifted between ideation and making, starting with a brainstorming session to get into my tourism capstone design brief. I used this time to unpack key themes, potential user experiences, and how my personal values intersect with the design opportunities in this space. Alongside this, I continued developing my Arduino-powered pencil sharpener. I focused on connecting all the necessary wiring—a process that required careful attention to how each component communicates within the circuit. Unfortunately this didn't go to plan...
So we're already in week 8 which is a bit scary. It's getting closer and closer to the business end of the year where I know things are really going to pick up in the commerce side of my degree. With a huge finance assignment due, an economics test, and 3 days of work per week for the rest of the semester I know it's going to take some planning and discipline to keep up some progress in this class.
As outlined in my week 7 post, while keeping up with the final making of the sharpener I really want to look over some capstone ideas now that I have my brief. Because I did Design 300 last year, I've already made a project proposal... that is completely useless to the new brief :(. So as recommended by my lecturer Nick I'll be looking to use this class to get a bit of a headstart on the project and figure out which direction I may want to go with it.
While the brief is different from last year, I was still drawn to the Emerging Technologies challenge, as I felt it still somewhat fit to my proposal on Māori mental health I created last year. My goal through the rest of this semester and even during the inter-semester break is to come up with a number of problems and new possibilities and from there see how current emerging technologies could be utilised to help solve them.
To begin I wanted to do a bit of a brainstorm before I conducted any research into the problem, just to get on paper how I may have initially processed this brief and my viewpoint on the direction to approach it before I am influenced by any information.
Below is a brainstorm looking at visitor experiences - more specifically common trends and key words, and specific experiences to Aotearoa.

After completing this initial brainstorm I got a better idea of my values and perspectives that surround visitor experiences. I think it is clear and unsurprising that I touched a lot on Māori experience in Aotearoa. I believe there are extremely different ways that Māori and Pākehā view our country and this could lead to different ways tourists therefore experience it. This will be something I will look further into as I start researching.
I also quite liked the idea of looking into how we perceive experiencing something and capture it. Outside of photos and videos, what other senses can we engage in a captured experience to make it more immersive. While VR is of course a default solution that comes to mind, I want to go beyond this and explore technologies that could maybe make this immersion more accessible and therefore impactful.
Finally in contrast I looked into some smaller-scale experiences of being a visitor. This included things like accommodation and how this adds to our experience, or luggage and language and how we manage these. Looking into more personal and intricate aspects of visitation like these could be another interesting angle to approach this brief simultaneously with the approaches above. This way I think I'll produce a broader range of creative ideas and maybe find ways they could connect.
Following last weeks successful prototyping with the code and breadboard, I felt ready to get building a functioning prototype. I found it pretty daunting knowing I'd have to build a prototype this time really being careful around the form, as wrong shapes or sizes could lead to short circuits in the wiring.
I therefore knew my first step was to visualise clearly what the sharpener would look like and then design the wiring in a way that may fit this form.

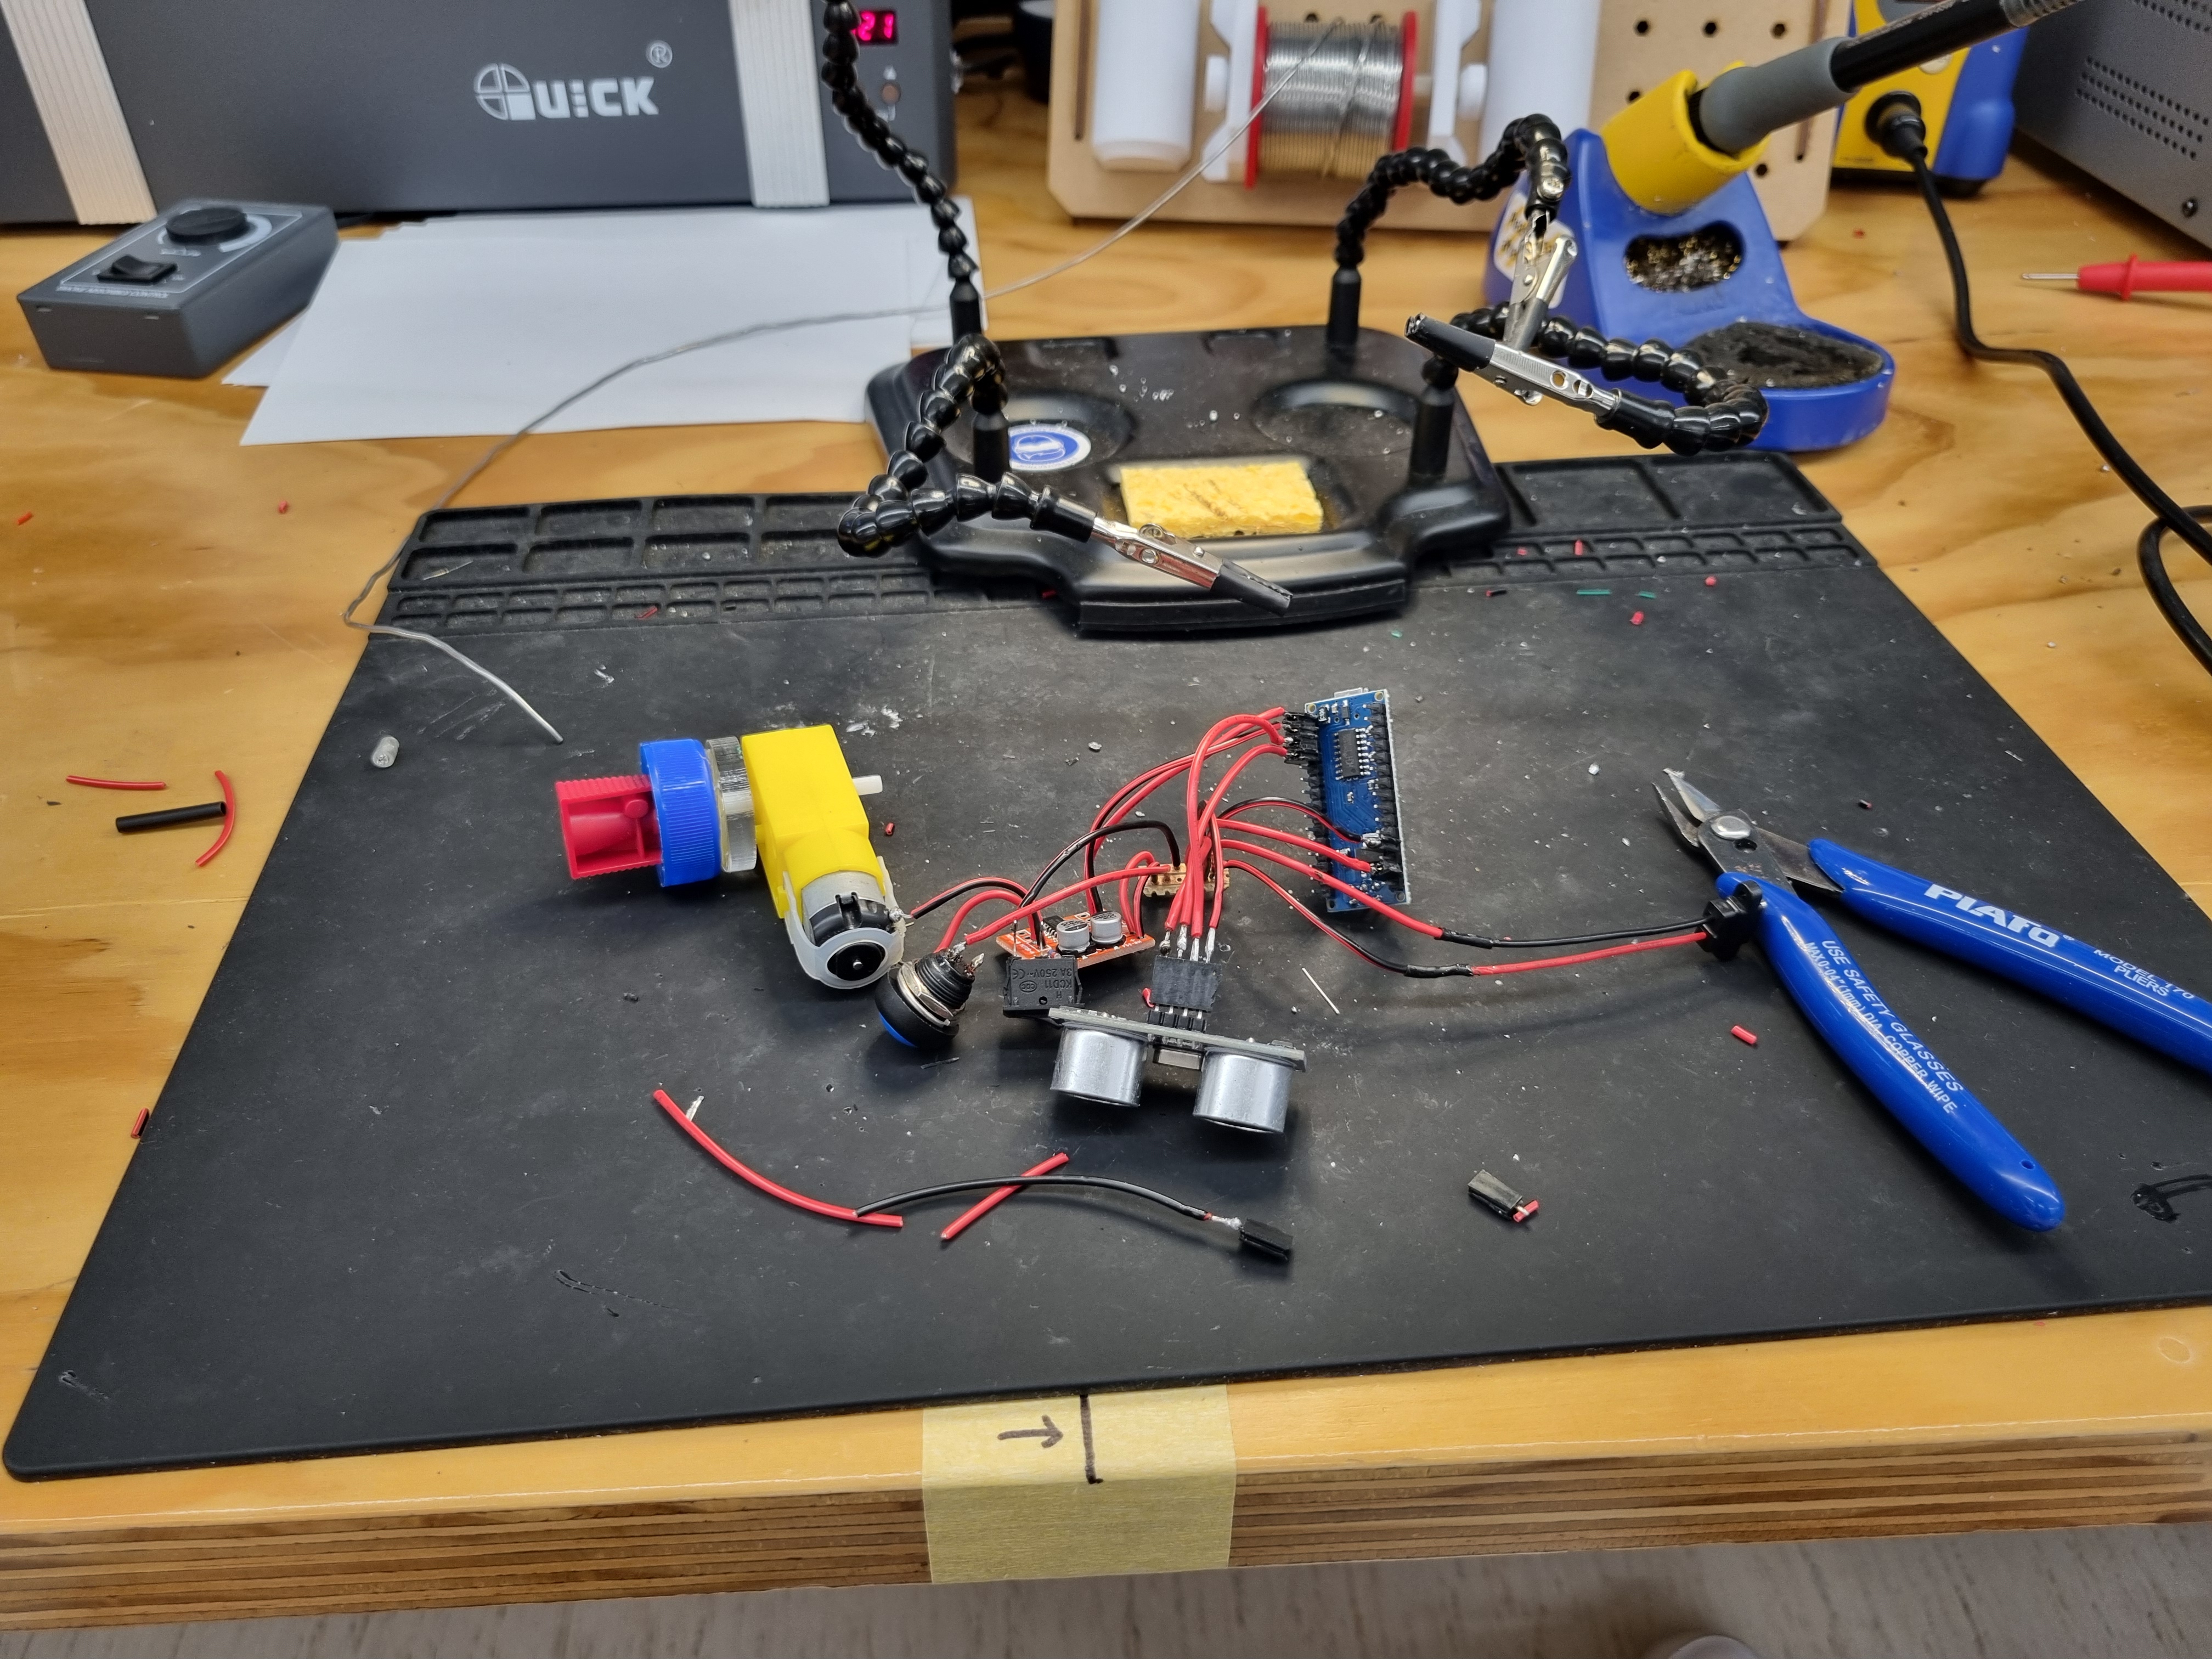
I wanted to start with a simple block sharpener with a space for pencil shavings, the sensor and the button for it to operate. This meant the form would be as simple as possible, and would give me plenty of room for the wiring to fit and hopefully not get damaged. I replaced the breadboard with the PCB seen above. These have copper coils running down each column where I can connect the power (+) and ground (-) wires to. I then ordered each of the wiring in order of where each part would be placed on the interior as seen above.
The Arduino will run along the back of the sharpener so the wires can all be easily connected at the back without needing to bend multiple different ways.
I knew for this I wanted to begin connecting and creating the wiring before beginning to build a shell that fits all the wires comfortably. I got to measuring all the wires out based on my sketches, then soldering them onto each component which took ages! Safe to say my soldering skills definitely needed some work, and my fingers were pretty blistered from gripping very hot wires for a few hours.
Then came my first significant setback which was..... it didn't work. After plugging it into power and uploading the code nothing happened. However, I knew because the light wasn't flashing on the Arduino it wasn't receiving power so it had to be something wrong with the PCB.
After consulting with Steve from the Design Lab he informed me I needed to cover all of the uninsulated wires and ensure that none of the solder from different polarities (positive wires and negative wires) were touching which would cause a short circuit.
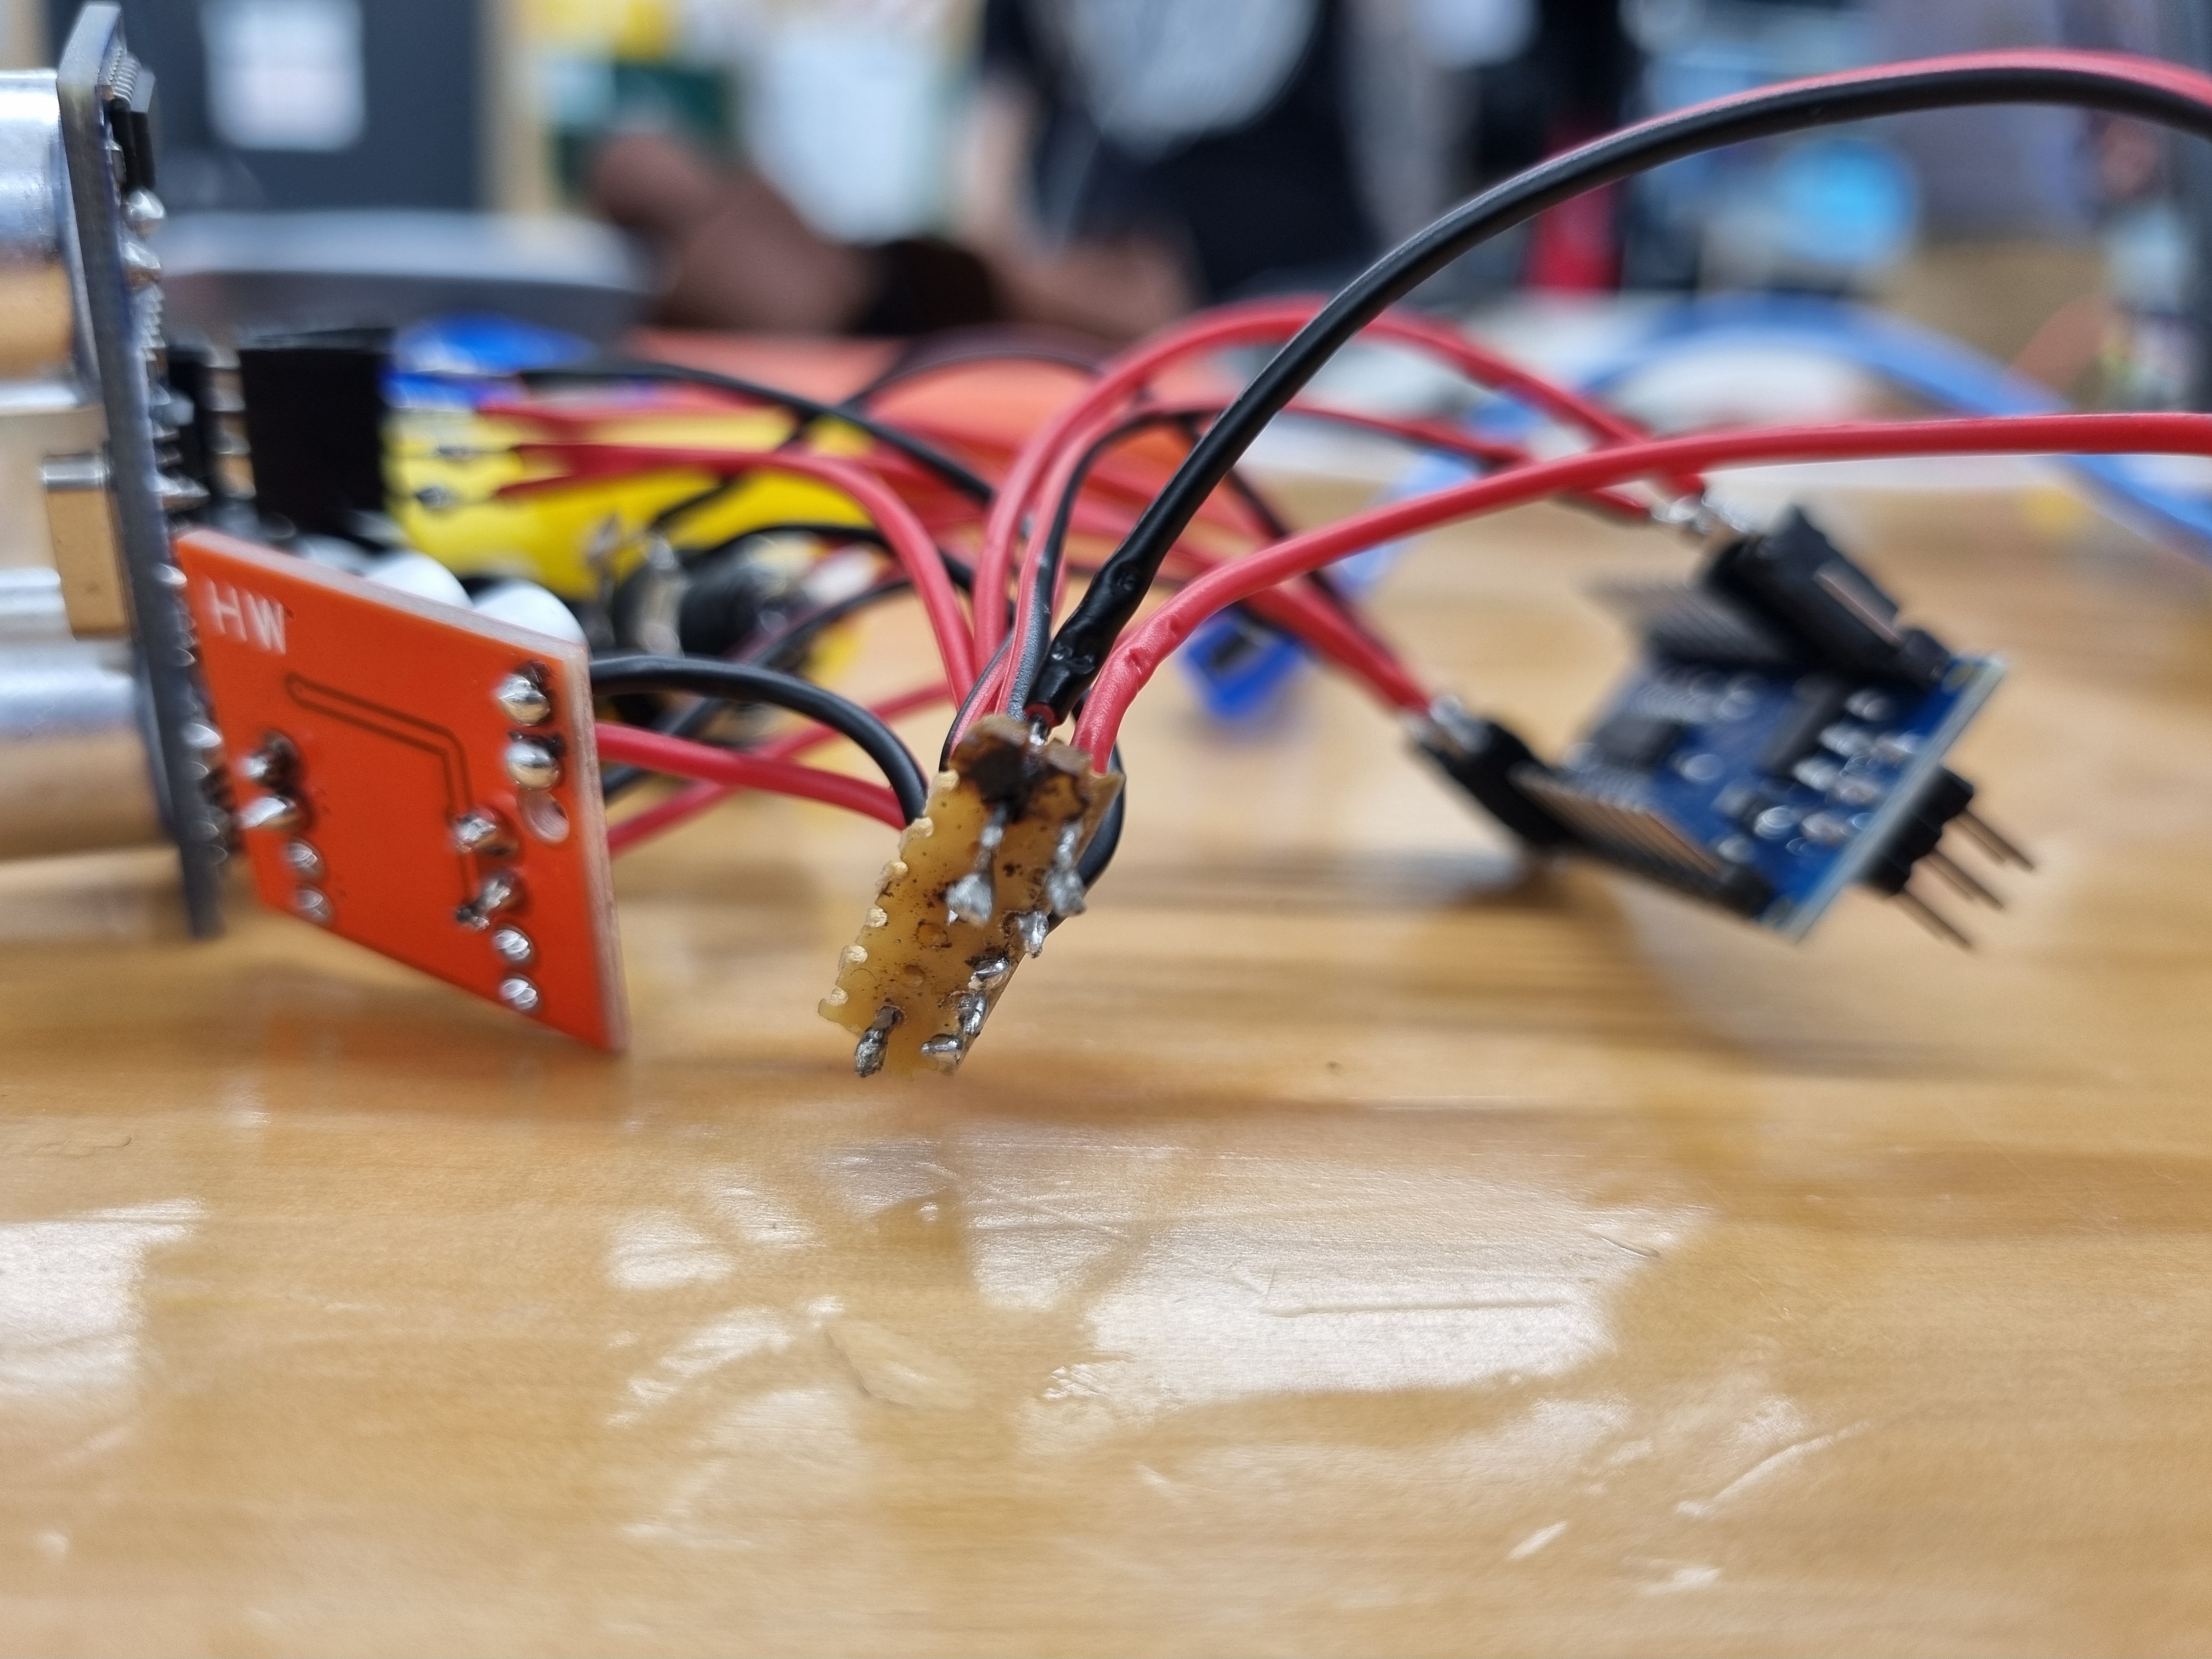
As seen above the wires weren't attached properly so needed more solder to be secure to the circuit - preventing short circuits. Below the wires are very close together so if they touch when the wires bend this could also damage both the circuits and wires.
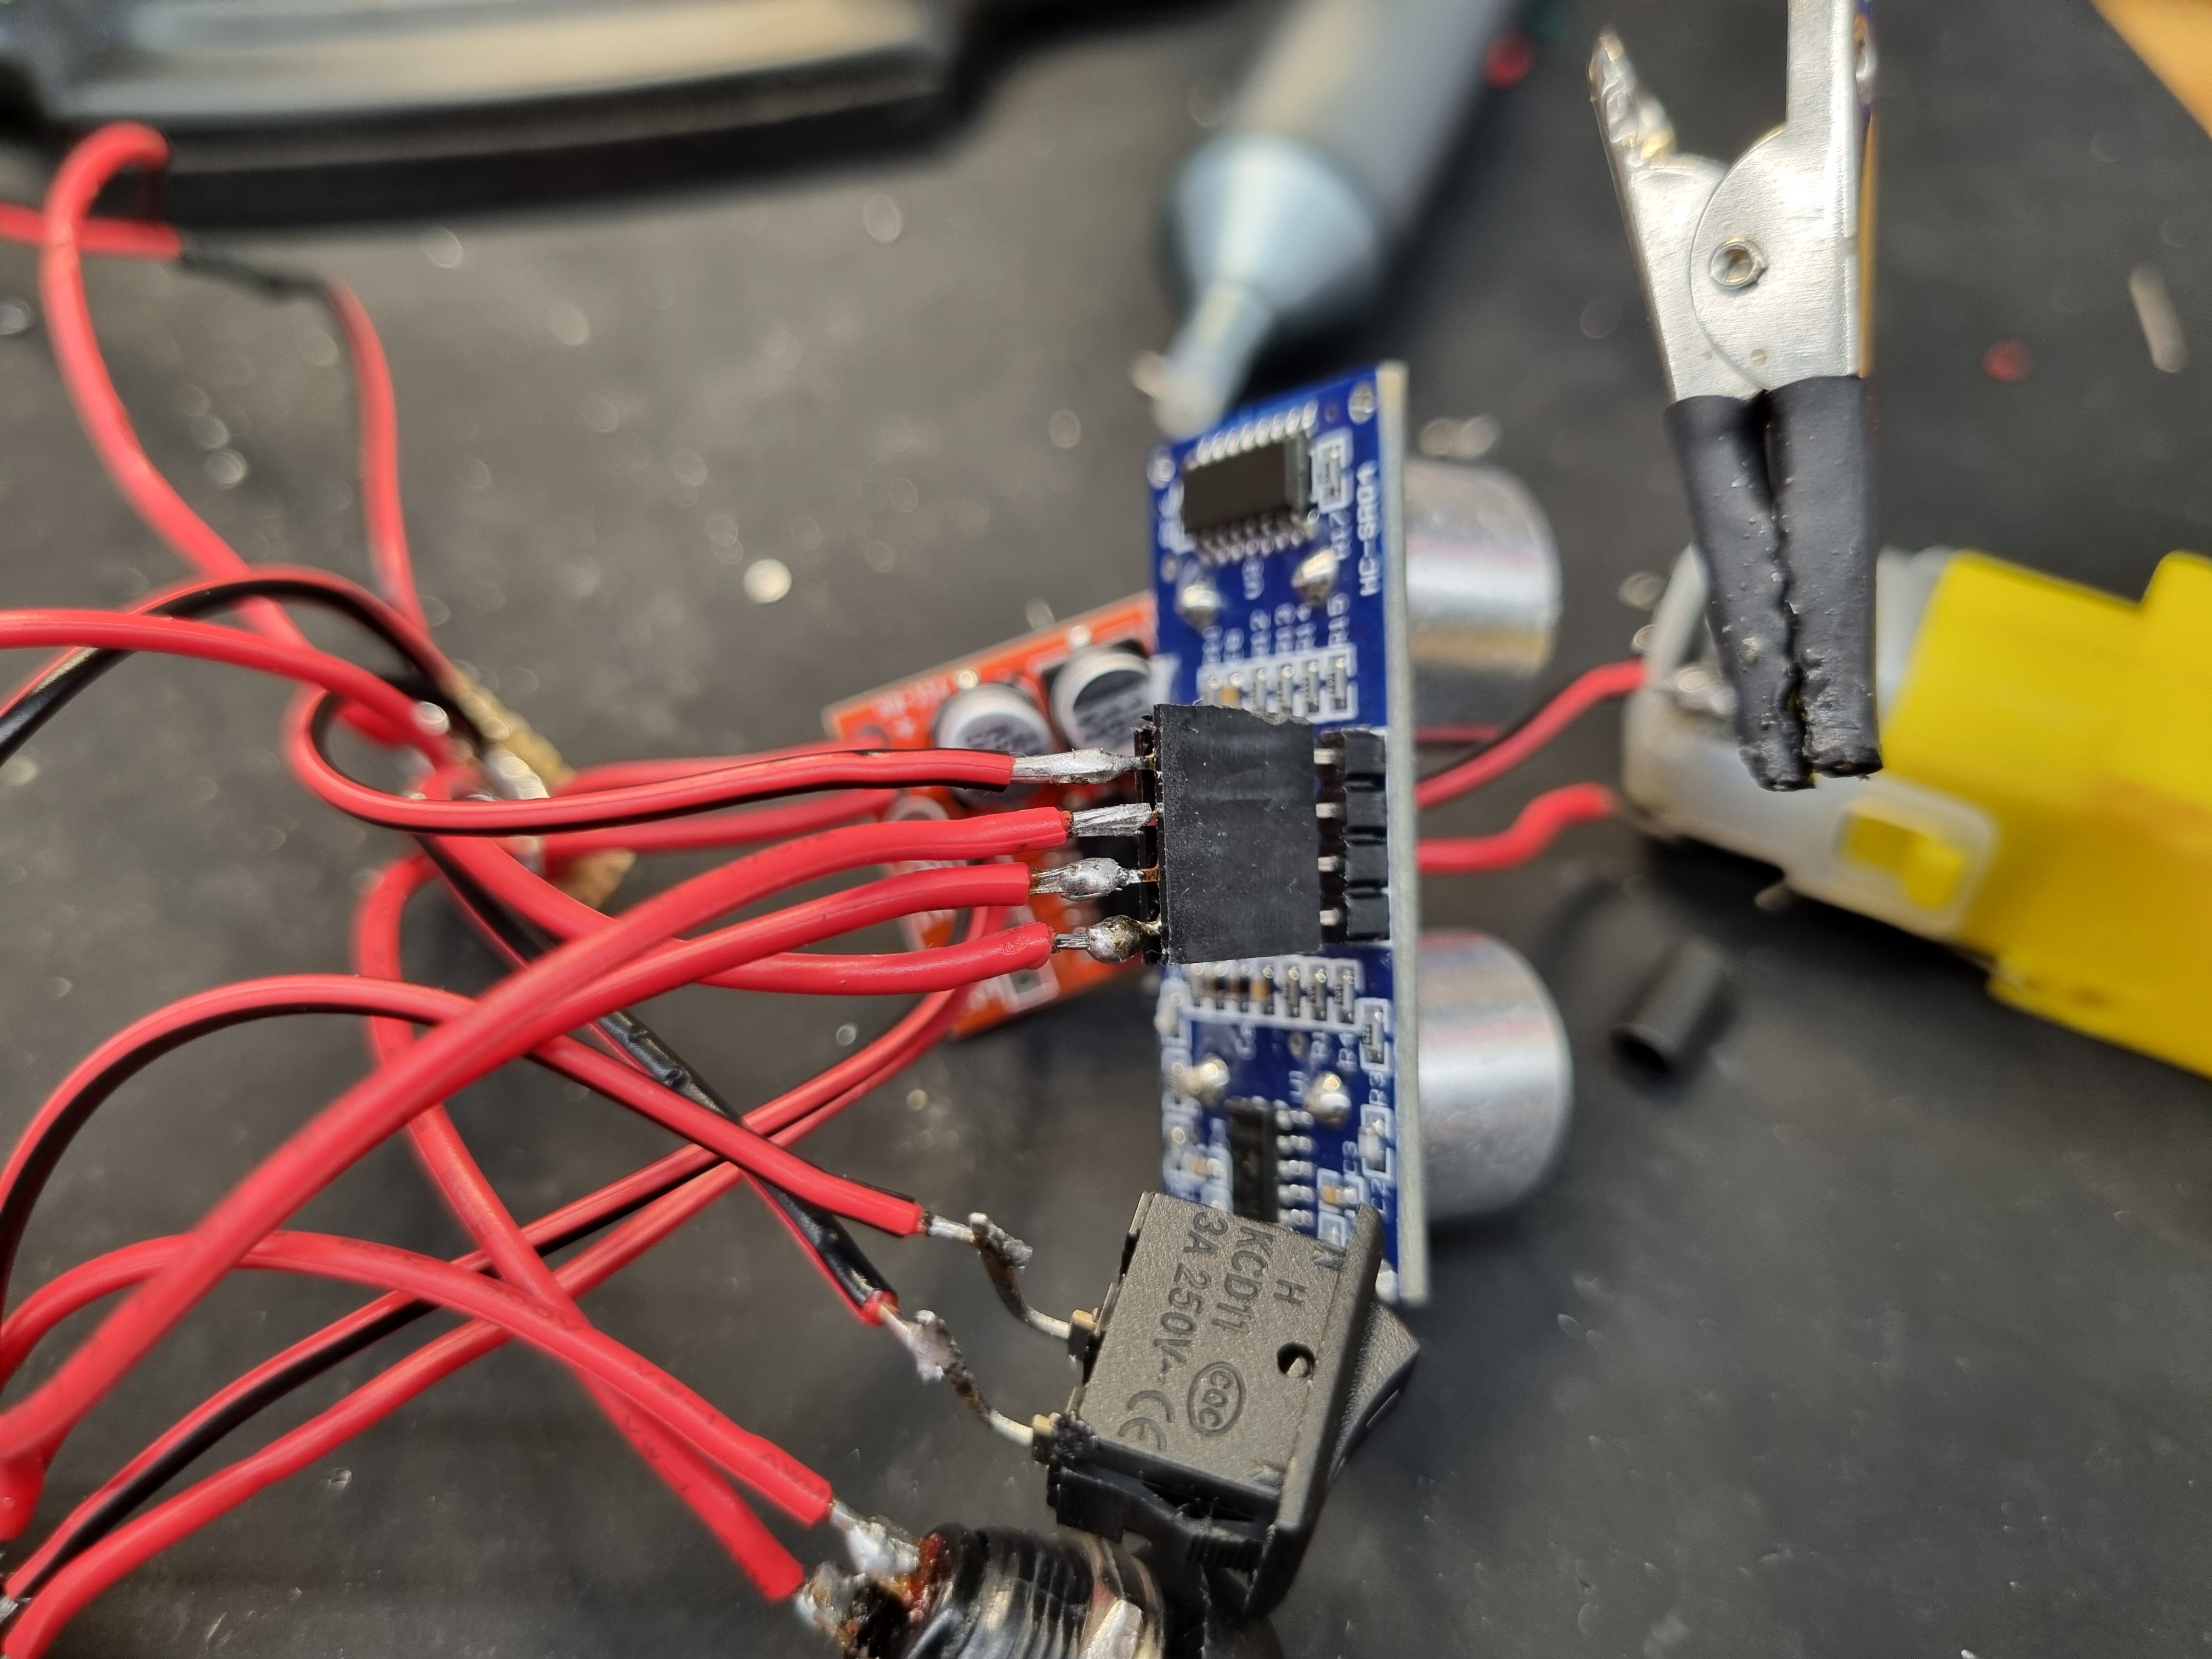
The way to solve this will be to add heat shrink to those exposed wires which essentially acts as an insulator so if the wires touch no current can be passed through. Unfortunately due to my extremely busy week, this will need to be something I look at next week.
This week was one of the more frustrating weeks I've had so far. Mostly due to the amount of time it took me to connect all of the wiring together only to find out it didn't work. I'm pretty dissapointed not to have a full functional model of this sharpener iteration ready for the crit however explaining this process and getting some feedback will have to do. While I understand failures like this are part of the process it is always super frustrating when hours of work turn into nothing. It just feels like every week these setbacks happen, it really limits what I'm able to produce by the end of the semester.
Fortunately, however, I've talked to Steve from the Design Lab who mentioned he'll help me to solder the rest of these wires and help me to get the circuit working. This way I'll get to watch someone who's quite experienced soldering efficiently and working with wires get to work on this task. I think this will help me a lot with seeing how he approaches different connections, and his strategies to make the process as quick as possible.
Finally, I still haven't been able to really dig into some progress on my capstone which I'm a little dissapointed about. I am just so busy with other assignments at the moment that it's been hard to look into this while continuing work on the sharpener. Unfortunately given the coming weeks only getting busier, this may continue to be a tough task. I'm not super worried about this however as I plan to do quite a bit of work on this during the intersemester break. I am heading to Sri Lanka so doing some research as a tourist should be super insightful!
This week as I was working on quite a bit of my wire connections, my learning focused on soldering correctly, and troubleshooting wire connections.
My first resource was on soldering where I watched a masterclass that looked at helping me with some solving tips to speed up my process.
I also looked a lot at common wiring mistakes as it felt like these continuously occured. I started with plenty of YouTube videos like the one below, however in the end found the Design Lab technitians to be best to talk to as they more accurately answered my most concerning questions.
This video was super helpful as this tool was in the Design Lab. It meant at all times I could see where my circuit was shorting.
While it's been a bit of a stagnant week, I'll have to essentially pass forward last weeks objectives next week to get this mold done for the sharpener and potentially get deeper into my capstone brief. This likely means I won't get a mold 3D printed next week however if I can get some kind of 3D model semi-ready I'll feel good heading into a final week of progress before my presentation.

